Portrait Pro 17
Editors’ Choice Software
May 2018
Portrait Pro 17
Review by Angie Kibiloski
PortraitPro 17 is the newest version of Anthropics Technology‘s top-notch photo editing software, with even more great features than their previous versions. This program, specifically designed for portrait retouching, puts an impressive number of editing tools at your fingertips. I have a decent baseline knowledge of photo editing, having been a Photoshop user for years, so I found this package extremely easy to jump into. The tools in this package are so user-friendly, though, that even a complete novice could find themselves retouching their own photos like a pro in no time. From subtle changes like adjusting the lighting and eliminating skin blemishes, to drastic alterations like face shaping and background replacement, PortraitPro 17 has the tools for all of it.
I’m going to walk you through most, but not all, of the intuitive, portrait editing tools, with some screenshots of my own headshot being edited as an example. I’ve gone a bit extreme on my photo with some of the tools, just so you can really see a difference between the Before and After images. If I was editing this photo for actual use, I’d use a subtler touch. That’s one of the great things about this program, though, the ability to employ the smallest level of retouching, or have some fun and give your portrait a full-on Barbie doll glamour look. All but a couple of the editing tools are controlled by a simple slider, so that you can adjust the setting of the tool up and down as gradually as you like, while the program shows you, in real time, the results of your alterations. I will mention how to control the couple other tools when I get to them, but otherwise, assume everything is on the slider system.
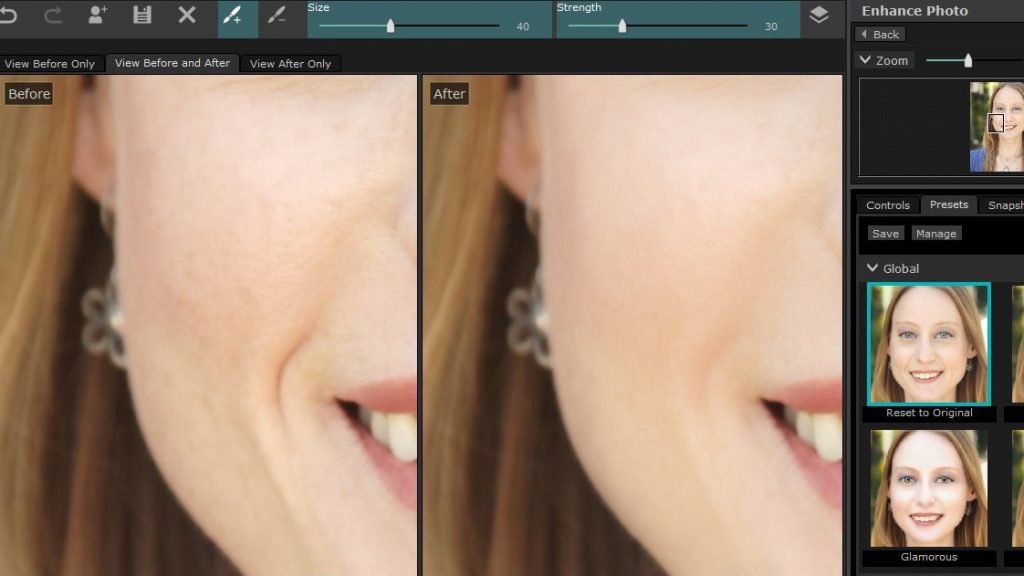
When you first load an image into the work area, you’ll see your Before photo on the left and your After photo on the right. All the changes you make will be on the right, so you can always compare it to the original. PortraitPro 17 will automatically find the face in your image and put a mask over it, each feature being outlined with adjustable lines and nodes. You’ll drag each node to match the masking lines as closely as you can to each facial feature. Zooming in helps a lot in this process. This mask will help the software give you the best results when using feature specific tools. As for the tools, let’s start with the subtlest tool of them all, the Touch Up Brush, which, unlike the other tools, can be found at the top of the screen. This tool can quickly, and easily retouch fine lines, wrinkles, blemishes, freckles, and other small imperfections, just by dragging the brush over these spots with your mouse. You can adjust the brush size and intensity of retouching, to get as little or as much coverage and precision as you want. This is a perfect tool for portraits that need very little work, but could benefit from 30 seconds of minor skin smoothing. From the subtlest to the easiest, the Presets tool is a small collection of preset adjustments for a portrait makeover in one click. Use them as they are, or as a starting point for further fine-tuning. You can also create custom presets, so you can quickly apply your own combination of retouches to future images in an instant. Personally, though, I like to have total control over my photo projects, so I prefer to go step-by-step through all the next batch of tools.
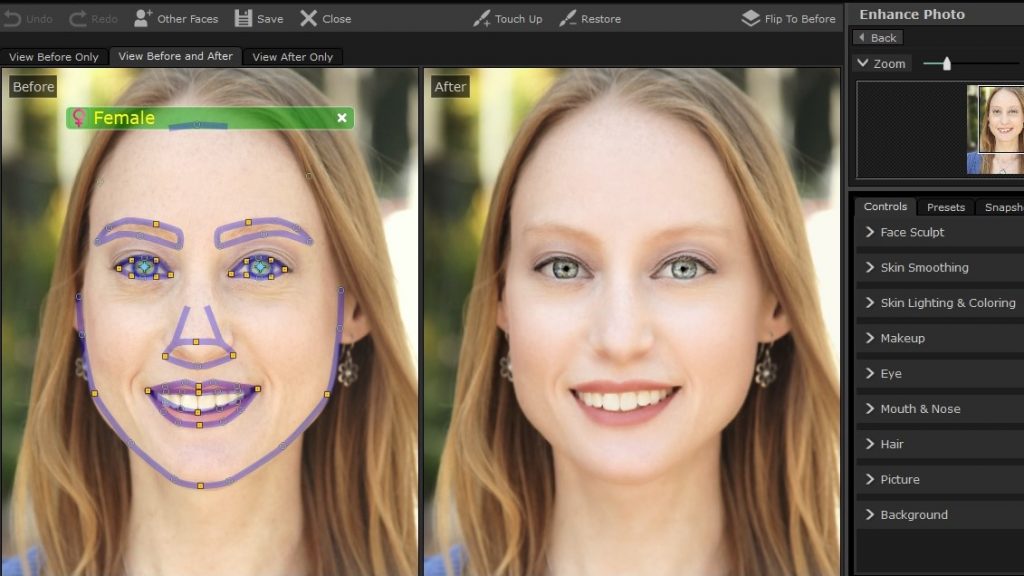
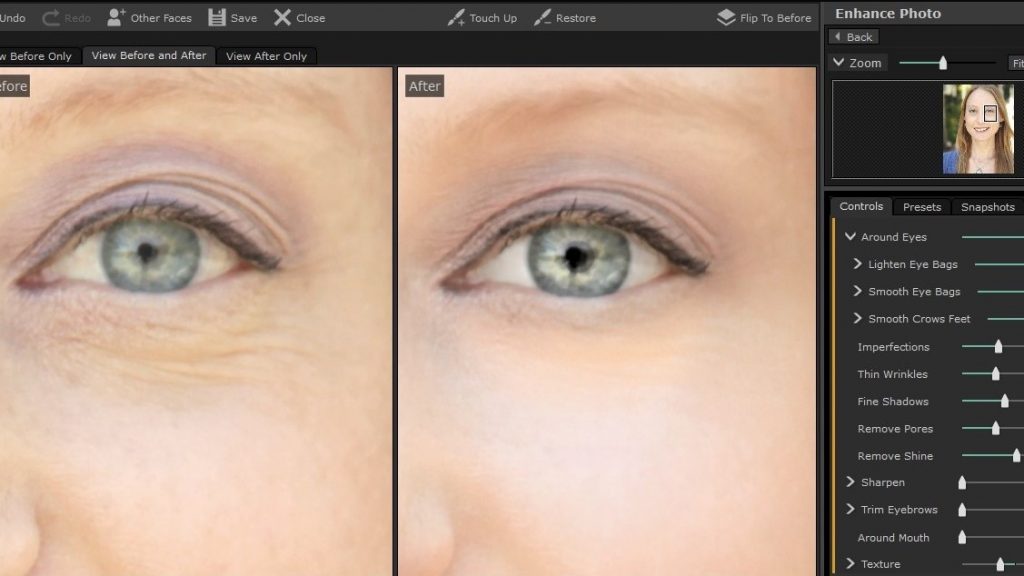
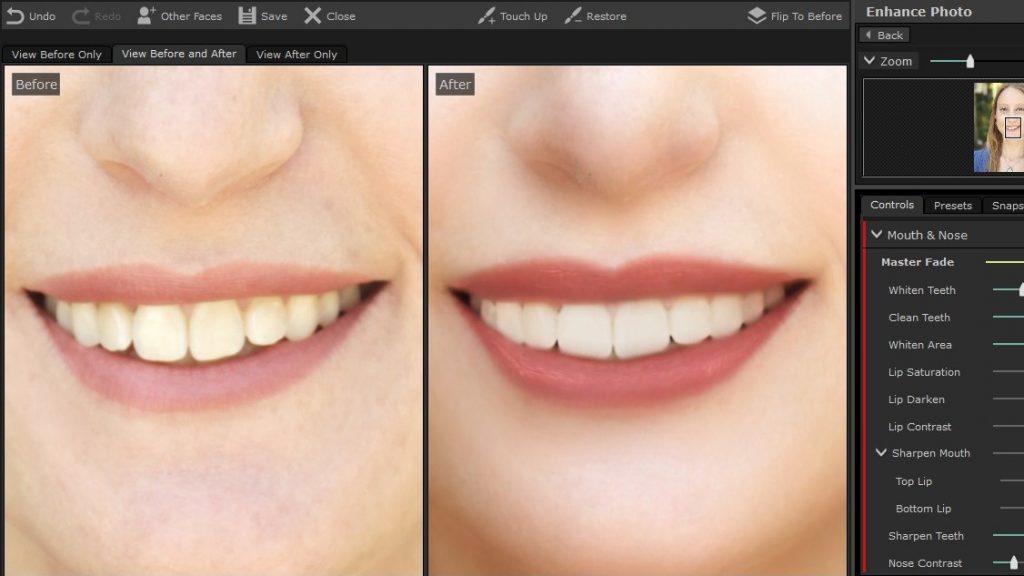
There are 9 master categories of tools: Face Sculpt, Skin Smoothing, Skin Lighting & Coloring, Makeup, Eye, Mouth & Nose, Hair, Picture, and Background. Under each category, there are a varying number of subcategories. For instance, under Skin Smoothing, there are Lighten Eye Bags, Smooth Crows Feet, Remove Pores, Trim Eyebrows, Skin Texture, and more. Under Eye, there are Whiten Eyes, Darken Pupil, Brighten Iris, and more. In many portraits, all you need to make a face seem more vibrant is a little smoothing under the eyes, whitening of the eyes, and whitening of the teeth, the last of which can be found under Mouth & Nose.
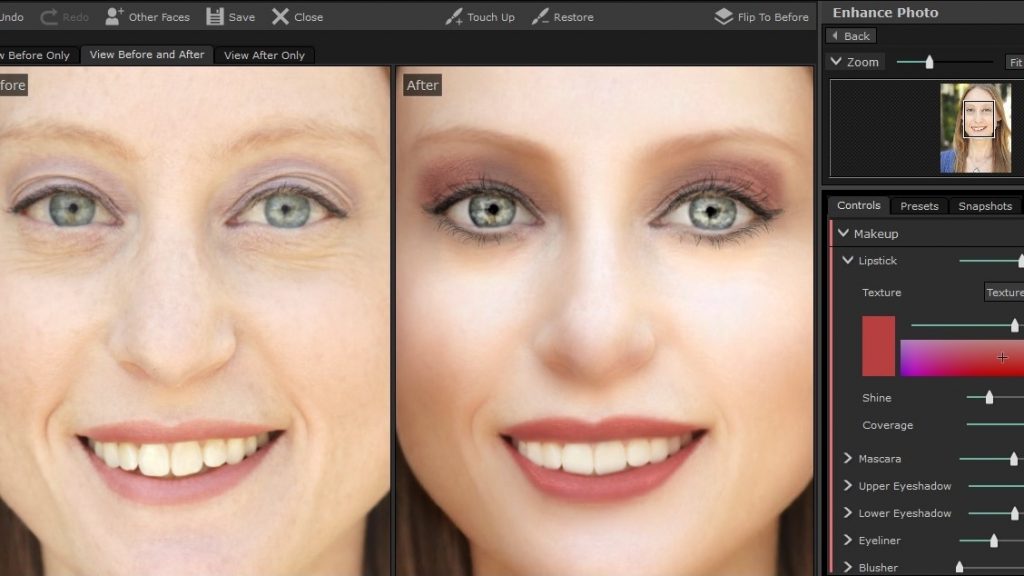
The above categories are great for adjusting the natural landscape of your face. But there are other tool categories that can add a little extra something to the image, like Makeup and Hair. Under Makeup, you can add many digital makeup options, like Eyeshadow, Mascara, Blush, and Lipstick. You’ll have the choice of colors, intensity, and shapes when applicable, like an Almond or Winged shaped eyeshadow, and a Liquid Line or Cat Eye liner. The color adjuster lets you move your pointer fully around the spectrum, so you can get the exact shade you want. I had a lot of fun playing with the Makeup tool, and trying out different looks! The Hair tool is another one that can add some pizzazz to your portrait, by changing the color of your hair. This is a little finicky to use, just because you have to create a hair mask, like we did with the face earlier. Except, instead of using lines and nodes, you’ll have to paint the mask over your hair with your mouse, so the program can tell the difference between your gorgeous flowing mane and the background. This can be tricky, depending on how steady of a mouse hand you have. I must say that this, and the Background tool, which uses the same masking method, were the only 2 items I found frustrating in this entire program. Once you’ve masked your hair, choose from a wide variety of color options, which will be applied immediately. See what you look like with a totally different color, or spruce up your own natural shade with a light auburn wash. Once you choose a color, you can further adjust intensity, shine, vibrance, and more.
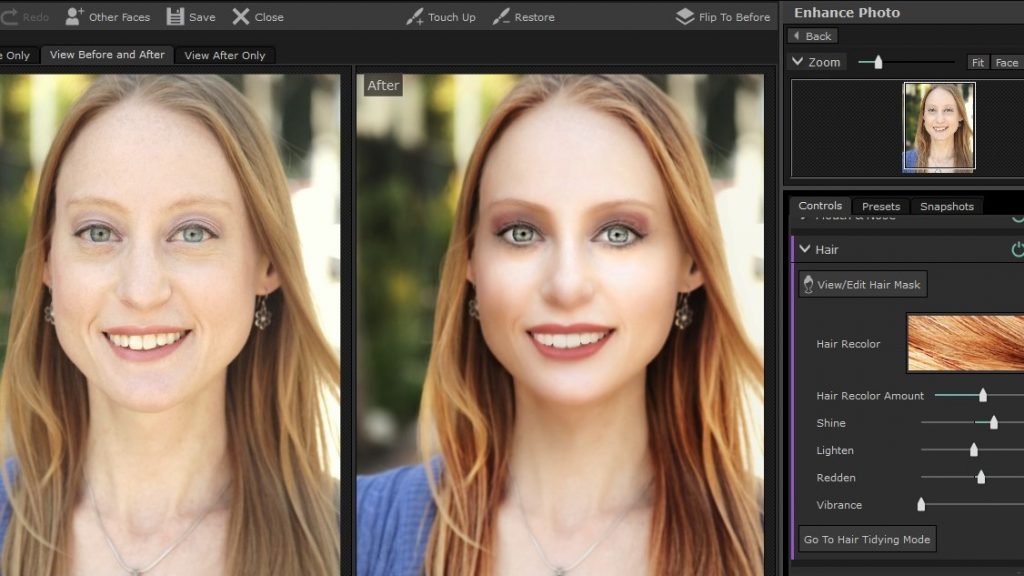
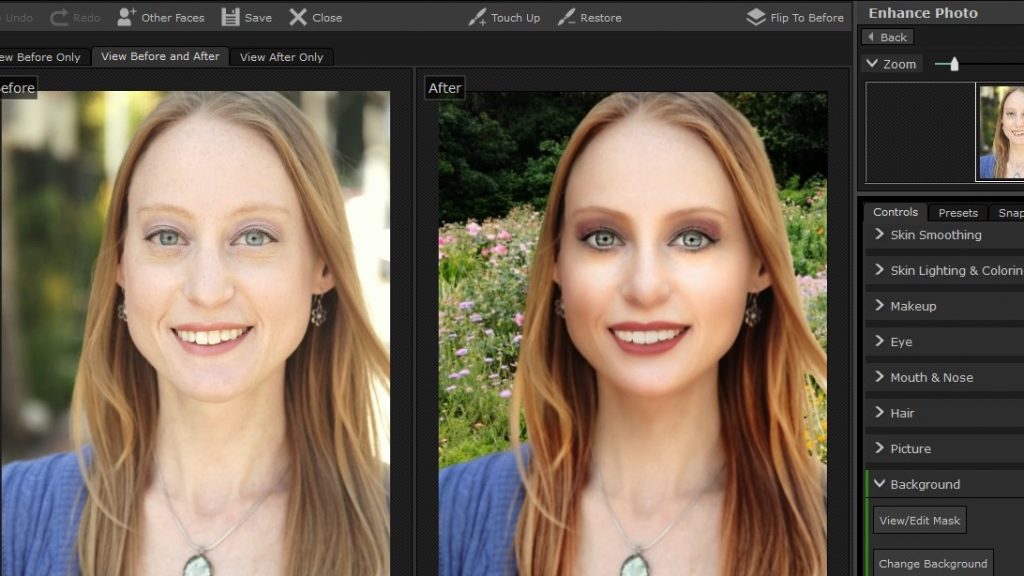
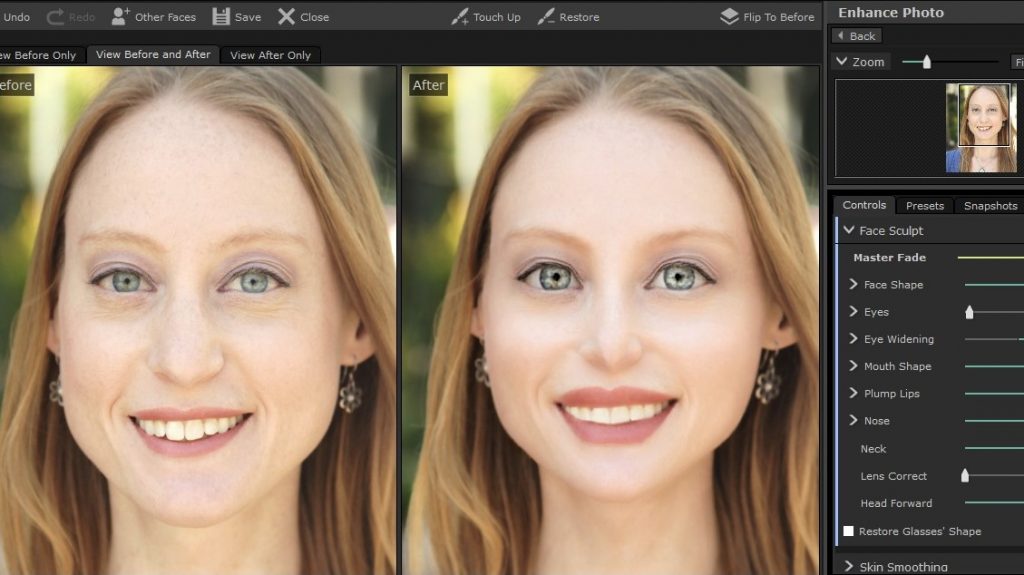
Now that I’ve highlighted several of the regular retouching tools, I’ll talk about the 2 most transformative effects, Background and Face Sculpting. As mentioned above, the Background tool requires you to mask what is background, and what is foreground. The software does an initial mask for you, as it does with the Hair tool, but it’s not 100% accurate, and it does it better with some photos over others. You’ll need to use the Fill Background/Foreground, Smart Background/Foreground, and Blur/Sharpen tools to really get the best match. After that’s done, you can choose to replace the existing background with a solid or gradient color, choose a background from the in-program sample images, or upload any photo of your own. In my example, I transported myself from a neighborhood street to a botanical garden. The 2nd tool, Face Sculpting, is a feature I think is more fun than useful on any regular basis, so I’ve gone as over-the-top as a few of the sculpting tools would allow, just for giggles. This tool lets you change the shape of your eyes, jaw, forehead, nose, and lips. You COULD use these far more gently than I have, to slightly narrow your nose, plump your lips, and widen your eyes the tiniest bit. If you do that sort of sculpting work just right, hopefully no one can see the difference, which is another reason why I wanted to go all out with my example, so you can see what the tool can really do.
There are 3 versions of this software, the Standard ($39.95), Studio ($59.95), and Studio Max ($119.95), all on sale for these listed prices right now on the PortraitPro site. All 3 versions include all the tools I’ve mentioned above, as well as free online support, age and gender detection during the face masking step, the ability to enhance more than one face in a single photo retouching session, read and write JPEG and TIFF file formats, and Snapshots, the tool that lets you save your work at multiple times during your editing process, so you can see your progress at each step. This can serve as a visual history of your work, so you can easily revert back to a previous step, if you decide you’ve gone a little too far with the sculpting, or applied changes that aren’t quite what you were looking for, without having to just hit the Back button a dozen times. The Studio and Studio Max versions can serve as Photoshop, Aperture, and Lightroom plug-ins, in addition to being used as stand-alone programs, can read RAW and Adobe DNG file formats, read and write 16 bits per color PNG files, and have Batch mode to work on multiple images at once. The Studio Max version goes one step further for Full Batch mode, to alter as many images as you want all at once. It allows you to set which enhancements that you want to utilize for all faces, with different sets for male, female, and child faces, and the program will automatically apply these to the entire batch.
PortraitPro 17 has even more features than I’ve had the time to talk about, so I’d recommend going and downloading a copy for yourself, so you can explore all the great editing tools it has to offer. If you just want a taste before making a purchase, you can even download a free trial package. I really love this program, with it’s wide range of editing options and super easy-to-use controls. I’ve been a Photoshop girl for a couple of decades, but it isn’t ideal for quick and easy portrait retouching. There’s nothing like having a program that’s specifically designed for a task, and for this one, PortraitPro 17 is perfect. Visit www.portraitprofessional.com to find out even more, and order your copy today.

