
The Complete Guide to Online Parental Controls (2024)
 The Complete Guide to Online Parental Controls (2024)
Final edit by Dr. Terry Kibiloski, Editor, Computer Times
This educational article merits our Computer Times Editors’ Choice award due to its excellent information presented in an easy-to-understand format to help parents protect their children online.
Reading time: 65 min
Updated on August 20, 2024

Keeping children safe in an increasingly digital world is a challenging task for any parent. Without the proper controls, kids can be exposed to a number of threats while taking part in activities online.
Multiple organizations that track online pedophilia estimate that there are 500,000 sexual predators are active on the internet each day. Alarmingly, as reported by the FBImore than half of the children victimized by these predators are aged 12 to 15. Equally as unsettling is that identity thieves target millions of children each year.
However your child spends time online, it’s important to set up appropriate parental restrictions to protect them. While these controls can never be completely effective, they allow you to monitor your children’s digital habits and prevent cybercriminals from contacting them.
With an ever-growing list of devices and apps children use, figuring out how to secure every platform can be time-consuming. This article will provide you with an effective strategy for each device and online platform so you can shield your children from harm.
How to Hide Inappropriate Content and Restrict Viewing Time on Popular Streaming Services
Excessive screen time and kids seeing inappropriate content are two of the biggest concerns for parents whose children are streaming content. Fortunately, it’s relatively easy to control these two factors on many of the most popular platforms.
Netflix
Understanding how to set parental controls on Netflix is crucial for safeguarding your children’s streaming experience. Fortunately, the streaming platform allows extensive restrictions to be applied to kids’ profiles.
Begin by creating a Netflix profile for your children, which is easily done by navigating to the Manage Profiles section of your account and selecting the “Kids”.
Kids profiles automatically restrict inappropriate content and prevent children from changing any of the settings. You also have the option of applying additional controls.
Managing the Autoplay Feature and Maturity Restrictions on Netflix Kids Profiles
Switching autoplay off:
- Open the Netflix app and navigate to “Manage Profiles.”
- Choose the profile you’d like to modify by pressing the pencil icon that pops up when you hover over its image.
- Under “Autoplay controls,” untick “Autoplay Next Episode in a Series on All Devices” to turn this feature off.
- Tap “Save” to confirm the changes.
Limiting access to age-restricted content:
Kids accounts will automatically have their viewing restrictions set to “T” or “Suitable for all ages.” However, you may want to adjust these restrictions for teenagers.
- Open Netflix, make your way to the menu, and tap “Manage Profiles.”
- Choose the profile you want to edit and scroll to “Maturity Settings”, then tap “Edit.”
- Enter your password when prompted and press “Continue.”
- Use the slider to set up the highest age restriction. You can also set a list of blocked titles by using the text bar underneath.
- Tap “Save” to authorize the changes.
To further secure your account, you can change your settings to make Netflix require users to input a 4-digit PIN before accessing certain profiles. Adding this layer of security to all the adult profiles on your account will help to prevent your children from accessing accounts without maturity restrictions.
Securing Adult Accounts with a PIN Code
- Go to the Netflix website and navigate to your “Account” page.
- Find the “Profile & Parental Controls” section.
- Select the profile you want to secure and tap “Profile Lock.”
- Enter your Netflix account password when prompted.
- Check the box next to “Require a PIN,” enter the four-digit pin that you’ll use to unlock your profile, and click “Save.”
- Keep in mind that you might need to refresh your browser for the changes to take effect.
Hulu
Although Hulu doesn’t allow for customized content restrictions, it offers an alternative in the form of Hulu parental controls.
This feature lets you create a separate account for your child where kid-friendly programming can be enabled with a single toggle. With this option turned on, your children will only be able to stream content rated PG, TV-PG, and below. If you try to bypass it and set up parental controls on your device or router, it’ll completely block all shows on the platform.
Creating a Kids Profile Using Hulu’s Parental Controls
- Sign in to your Hulu Account.
- Click your profile icon in the top right corner and select “Manage Profiles” from the drop-down menu.
- Tap “Add Profile” switch the toggle under “Kids” to on, and enter your child’s details.
- Press “Create Profile” to save.
If you don’t already have a PIN protecting your account, Hulu will likely prompt you to create one when you add a kids account. You can also do this manually:
- Sign into your Hulu account and navigate to “Manage Profiles.”
- Toggle on “PIN Protection” underneath “Parental Controls.”
- Enter your four-digit PIN and click “Create PIN.”
Enabling this feature will prevent users from exiting a kids profile and entering a non-kids profile without using that PIN. It will also prevent anyone from creating additional profiles without entering the PIN.
Amazon Prime Video
With Prime Video parental controls, you can restrict viewing to titles rated under PG-13, prevent autoplay, and disallow purchases without a PIN on certain profiles.
It’s best to turn on parental controls using your laptop as there are quite a few steps to follow.
Creating a Kids Profile on Amazon Prime
- On the Amazon Prime Video website, hover over your profile name and click “Add New.”
- Click “Create Profile,” name the profile, and switch the toggle next to “Kid’s profile?” to the on position.
- Click “Save changes.”
In addition to kids profiles, Amazon Prime Video allows you to set a PIN. This allows you to prevent kids from switching to a non-kids profile and restricts them from making any purchases without first inputting the PIN.
Creating a PIN on Amazon Prime
- On Amazon Prime, hover over your profile icon and click “Manage profiles.”
- Click “Edit profile” and select the account holder’s profile.
- Tap “Manage” alongside “Account PIN and locks.”
- Next to “Prime Video Account PIN”, click “Create.”
- Enter your four-digit pin and tap “Done.”
- To activate the PIN, toggle on “Profile lock”, and click “Save.”
You can also toggle on “Creation and removal lock” to prevent anyone from creating a new, unrestricted profile without your PIN.
For older kids and teens, you might want to set content restrictions instead. The age ratings that you select will apply to your entire account. This means that you’ll need to enter your PIN whenever you want to watch content above your viewing restricted age – even if you’re on your own profile.
Creating Viewing Restrictions on Amazon Prime
- Go to the Amazon Prime website and click on your profile icon.
- Select “Account & Settings” from the drop-down menu.
- Open the “Restrictions” tab and scroll to “Viewing restrictions.”
- Choose the maximum rating that you want to apply to your account and check the boxes next to the devices that you want these restrictions to apply to.
Disney+
Disney+ is a platform geared towards kids and teens, so you don’t need to worry about them coming across any R-rated content. However, as the app also has National Geographic and Marvel shows, some titles may be less appropriate depending on your child’s age.
Luckily, you can block any content rated above PG by creating a Kids Profile with rating restrictions or using Junior Mode.
Junior Mode will automatically restrict all movies and shows above a G-rating (appropriate for “general” audiences), prevent ads from showing, and disable autoplay. You can also enable the “Kid-Proof Exit” in this mode, which makes it more difficult for kids to leave their own profile and enter another.
Keep in mind, however, that you will not be able to manually adjust content ratings when Junior Mode is on.
There are two different routes that you can take to set up kid-friendly profiles, depending on whether you choose to enable Junior Mode or not.
Creating a Kids Profile with Junior Mode on Disney+
- Open the Disney+ app. On the home page, click on the “+” above “Add Profile.”
- Choose an avatar (your child may want to do this themselves), add a profile name, and enter the other required details.
- Switch the toggle alongside “Junior Mode” to the on position and tap “Save”.
- Enter your password to confirm that you want to create a kids profile, click “Continue,” proceed to the consent form, and click “Agree.”
- Return to the home screen, click on your profile icon, and tap “Edit.”
- Select the kids profile you want to edit, scroll down to “Parental Controls,” and toggle “Kid-Proof Exit” on.
- Scroll back to the top of the page and click “Done” to confirm your changes.
Creating a Kids Profile with Content Restrictions on Disney+
- On the homepage of the Disney+ app, tap “Add Profile.”
- Select an avatar, enter your child’s credentials, and click “Save”.
- On the next screen, choose the “Full Catalog” option and confirm your choice by entering your password and clicking “Continue.”
- Follow the prompts to add a four-digit PIN to the profile and tap “Set Profile PIN” to save.
- Click on the icon of the profile you just created in the left-hand menu, tap “Edit”, and select the profile again.
- Scroll down to “Parental Controls”, click on “Content Rating,” enter your password when prompted, and click “Continue.”
- Select the maximum rating for shows that you want the profile to be able to access and tap “Save.”
- Scroll back to the top of the page and click “Done” to confirm your selection.
Protect Your Children From Pressure on Social Media
YouTube
YouTube provides a tremendous amount of videos for users of all ages, but places absolutely no restrictions for any viewer by default. This increases the risk of your child accidentally stumbling upon explicit, scary, or disturbing content.
Luckily, you can turn on restricted mode on the website itself or even download YouTube Kids—a separate, child-oriented platform that features only safe and appropriate content.
YouTube Kids comes with limited functions and a restrictive filter that blocks most inappropriate videos. You can even apply age-based restrictions.
“Pre-School” works best for children younger than 4 years old, “Younger” will display videos for kids up to 8 years old, and “Older” is designed for users aged from 8 to 12 years old.
Change Age-Appropriate Settings on YouTube Kids
- Open the YouTube Kids app. You’ll be prompted to sign in with your Google account.
- Now, create your child’s profile. Enter his or her first name, age, and month of birth.
- Select the age group content your child is allowed to view. YouTube Kids will automatically recommend the best option based on the details you entered before.
- Tap your child’s profile icon. The app is now ready to use!
You can further customize your child’s YouTube Kids experience by adjusting various parental controls and settings. These controls let you block content, turn off the search feature, disable autoplay, review watch history, and turn on YouTube Premium benefits.
However, YouTube Kids isn’t always perfect. It’s possible for some weird and disturbing videos to slip through the filters, so don’t let your child use the app on their own.
Moreover, the older your children get, the more likely they are to rebel against using a restricted kid’s app. To avoid unnecessary arguments and stress, you can allow them to use the standard version of YouTube, but remember to turn on Restricted Mode. This option is available on both the browser and mobile version of the platform.
Turn on Restricted Mode From YouTube.com
- Log in to your child’s account and select the profile icon in the top right corner.
- Tap “Restricted Mode: Off” at the bottom of the drop-down menu.
- A window will pop up with information about what the setting aims to do. Turn Restricted Mode on by clicking the toggle.
Following these steps will activate the restrictions within that particular browser. If your child uses any other browsers, you’ll need to repeat these steps for each one.
Activate Restricted Mode on the YouTube App
- Open the app and press the profile icon in the bottom right corner.
- Select the settings icon in the top right corner and tap “General.”
- Scroll down to find “Restricted Mode.” Tap the option to turn it on.
- Repeat the same steps for any other Android and iOS devices your child uses to watch YouTube.
There are some additional settings you can access on the full-access version of YouTube to ensure your child has a safer browsing experience.
How to Access Additional Security and Privacy Controls on the YouTube App
- On your child’s profile, press the profile icon in the bottom right corner, and then tap the gear icon in the top right corner.
- Tap “Your data in YouTube” to access all settings related to watch history, search history, and Google-wide controls, such as location history and personalized ads.
You can block specific contacts that you do not want your child interacting with under “Privacy.” You can also disable inappropriate messages from appearing on any live videos your child hosts by switching on the “Hold for review” feature under the “Live chat” settings.
TikTok
TikTok is wildly popular with children and teens. Despite its 12+ rating, TikTok can still expose children to fantasy violence, explicit content, crude humor, and inappropriate references. The app’s algorithm customizes content on the main feed, often using extensive user data. As such, it’s essential to understand how to put parental controls in place on this platform if you want to keep your kids safe online.
Fortunately, TikTok provides several options to enhance your child’s profile safety. To activate these, you’ll have to set up your own TikTok account and link it with your child’s. This “Family Pairing” feature enables you to block certain types of content, disable direct messaging, and control the amount of time your children can use TikTok for.
Accounts held by users under 18 are automatically set with a 60-minute daily screen time limit. Once this limit is reached, a passcode is required to continue using the app, adding an additional layer of control.
How to Activate Parental Controls on TikTok
- Open TikTok and log in to either your account or your child’s account.
- Navigate to the profile page and, select the hamburger in the top right corner, and find the privacy section.
- Tap “Digital Wellbeing,” then “Family Pairing.”
- Follow the in-app prompts to activate these settings.
- Once set up, press “Restricted Mode” to turn it on.
- Finally, create desired time limits by tapping “Screen Time Management” and choosing from available options.
You can also set your child’s account to private to prevent strangers from viewing their clips. Using your kid’s profile, go into the privacy section, tap “Privacy and Safety” and switch on “Private Account.”
Nearly three-quarters (70.4%) of Instagram users use the platform to share photos and videos. With 62% of teens surveyed noting that they use Instagram, it’s clear that you need to have some measures in place to ensure that your kids stay safe when sharing content on the channel.
Instagram has a variety of controls that you can use to manage what your children—and anyone who might want to interact with them—can share and see. These range from creating private profiles to limiting who can message, mention, or tag them. There’s also an option for you to get a report of their activities on the app.
Maintaining Your Child’s Privacy on Instagram
Creating a Private Profile
Setting your child’s profile to private will require them to approve follow requests and prevent anyone who isn’t a follower from seeing their activity.
- In the Instagram app, tap on the profile photo in the bottom right-hand corner of the screen.
- Tap the hamburger menu (three horizontal lines) in the top right-hand corner of the profile page.
- Scroll to “Who can see your content” and tap on “Account privacy.”
- Toggle the switch alongside “Private account” to the on position.
Limiting Who Can See Your Child’s Activity and Interact with Them
Ensuring that unknown third parties can’t like, comment, message, or tag your kids is a great way to keep them safe online.
- Open Instagram on your child’s smartphone and tap on their profile image in the bottom right-hand corner.
- Navigate to “Settings and activity” by tapping on the three horizontal lines in the top right-hand corner of the screen.
- Scroll down to “How others can interact with you.”
- Tap on the items that you would like to manage:
- Messages and story replies: Control how people can reach your child on Instagram, as well as who can see when they’re online.
- Tags and mentions: Manage who can tag your child, how tags can be approved, and who can mention them.
- Comments: Allow comments from certain categories of users or block comments from specific users.
- Sharing and remixes: Control who can reshare, reuse, or remix your child’s content.
- Restricted: Prevent certain users from interacting with your child.
- Limited interactions: Temporarily limit certain users and groups of users from interacting with your child.
- Hidden words: Hide unwanted comments and messages that contain words on a list that you define.
In addition to these safety measures, you can also activate “Supervision.” This will allow you to set limits on when and how long your child can use Instagram, see who your kid is interacting with, and approve any settings changes they want to make.
You will need to invite your teen to Supervision.
Monitoring Your Child’s Activity with Supervision on Instagram
- On your teen’s Instagram app, tap their profile photo in the bottom right corner of the screen.
- Tap the hamburger menu in the top right corner and scroll to the “For families” section.
- Select “Supervision” followed by “Get started.”
- Find your profile and invite yourself to Supervision on Instagram.
- Switch to your Instagram account and accept the invitation. You will be taken to the “Family Center”. Follow the prompts and tap “Accept invite.”
- Tap on your child’s profile under “Accounts you supervise” to arrive on the Supervision dashboard.
- On the dashboard, you can:
- See how much time your child spends on Instagram: This is displayed in a graph and as a daily average.
- Set usage limits: Tap “Set limit” next to “Time on Instagram.”
- See who your child is interacting with: Scroll down to “Followers and following” to see profiles. Tap “See more” for a more detailed look.
If you notice any inappropriate behavior related to your child’s account, don’t hesitate to report and block the account responsible. You should also teach your children how they can report it themselves. Instagram takes privacy concerns very seriously and will resolve your issue as quickly as possible.
Snapchat
Snapchat’s amusing filters and in-the-moment sharing makes it widely popular amongst younger teenagers. However, certain features (like displaying users’ specific location) pose a huge threat to children who use the app.
Despite Snapchat having multiple privacy protection settings, reports of sexual predators on the platform are still a regular occurrence. Make sure to enable as many safety features as possible to increase your child’s security when using the app.
Activating All Protective Measures on Your Child’s Snapchat Account
- Open the app on your child’s phone. Tap on your child’s avatar in the top left corner, then tap the gear icon. In the settings menu scroll down to “Privacy Control” and –
- Tap “Contact Me” and tick “My Friends” to limit the people who can contact your child to their known contacts only.
- Navigate to “View My Story,” to choose who can see what your kid posts online. Tap “Friends Only” or “Custom” to allow only certain account tags.
- Uncheck “See Me in Quick Add” to disable the account from showing up in search results.
- Tap “See My Location” and shift the toggle alongside “Ghost Mode” to the “on” position and select the period of time you would like the device’s location to be hidden.
- Go back to the Settings menu and scroll to “My Account.” Tap “Mobile Number” and deselect “Let others find me using my mobile number.”
If you have your own Snapchat account, you can set up “Family Center” to help monitor your child’s experience on the app. This tool will allow you to see who your teen is friends with and who they’ve chatted with in the past seven days, but it won’t show you the content of those messages.
Using the Family Center in Snapchat
- Search for your teen’s profile using their username and add them as a friend.
- Navigate to your profile and tap the settings icon. Scroll to the “Privacy Controls” section and tap “Family Center.”
- Open “Family Center” and invite your teen. Get your teen to log in to their account and accept your invitation.
Once your child accepts your invitation, you will be able to see who they are talking to and set content controls.
According to its terms and conditions, Facebook doesn’t allow anyone under the age of 13 to set up an account. However, recent research reveals that 45% of children under the age limit are already using Facebook on a daily basis.
If the platform’s user data collection isn’t enough to encourage you to add extra protection to your child’s account, its regular involvement in data breaches definitely should. Applying even a few additional security settings may save your kids from becoming victims of various cyberattacks, including identity theft.
Adjusting Facebook’s Privacy and Security Settings on Your Child’s Account
- Using your child’s account, tap their profile photo in the corner of the screen; this will either be in the top or bottom right corner, depending on your device. Scroll down and tap “Settings & Privacy.”
- Select “Privacy Checkup.” On the mobile app, you will have to select “Privacy shortcuts” in the Settings and Privacy menu to find Privacy Checkup.
- Tap on each card and follow the on-screen instructions.
- On desktop, go back to “Settings & Privacy”, select “Settings” and then “Privacy”. On mobile, you will find these settings under “Settings” or “Privacy shortcuts,” depending on your operating system. From here, you can manually change settings related to your child’s profile, tags, stories, reels, and blocked accounts. You can also view what your child’s profile looks like to others.
X
X offers many of the same parental controls that were available back when it was Twitter. The settings aren’t turned on by default, but are very easy to find and enable.
Implementing X (Formerly Twitter) Parental Controls
- Open the X app and log in to your child’s profile.
- Click on the profile image in the top left corner to open the menu. Tap “Settings and Support,” and select “Settings and privacy.”
- Tap “Privacy and safety.” Most security options can be enabled and disabled by toggling them, such as Tweet protection, blocking sensitive content, and restricting live videos.
- In “Audience and tagging”, tap “Photo tagging” and turn it off.
- In “Direct messages,” select “No one” under “Allow message requests from”, and disable calling and read receipts.
- Under “Discoverability and contacts,” toggle the switches under “Discoverability” to prohibit anyone from finding your child’s account by email address or phone number. You can also turn off contact syncing between X and phone numbers on your kid’s device.
- At “Mute and block” you can create a list of blocked and muted accounts or words. Simply tap each option and enter profile names or phrases you’d like your child to avoid.
- Under “Location information”, disable “Precise location” to block X from accessing the device’s specific location.
- At “Data sharing and personalization,” disable all forms of data collection and ad personalization.
Although it’s generally only a hub for users to find ideas like recipes, home, and fashion inspiration, Pinterest can occasionally contain content that’s not suitable for all audiences.
While the platform lacks parental controls to block such content, you can still enhance your child’s safety on the site or app by implementing appropriate restrictions on their browser or device and regularly monitoring the images and boards your child interacts with.
Implementing Pinterest Parental Controls on Your Child’s Account
- Using your child’s account, click on the profile image to access their profile. The profile image will either be in the top or bottom right corner of your screen.
- On desktop, click the dropdown arrow in the top right of the screen and click “Settings”. On mobile, tap the settings icon in the upper left corner.
- On this menu, navigate to “Profile visibility”. Toggle on “Private profile” and “Search privacy.”
- Return to the “Settings” menu. Navigate to the social permissions section. From there, you can apply filters to block direct messages, disable comments on pins, and block comments containing specific words or phrases from showing up in your child’s feed.
- Finally, back in the “Settings” menu, tap “Privacy and data” to disable all forms of personalized ads and recommendations shown to your child.
Twitch
If you’re looking to apply parental controls to your child’s Twitch account, you’re not going to find many. Despite allowing gamers and streamers as young as 13 to set up a profile, the platform doesn’t actually put any protective restrictions in place.
As Twitch is a live streaming platform, it makes it almost impossible to moderate and filter its content. The only protection you can apply is disabling direct messages on the website.
Luckily, many official streamers (like Ninja or DrGluon) keep their channels child-friendly and avoid explicit language and references. While they may still play games aimed at a more mature audience, you wouldn’t find anything inappropriate in their chats.
However, many gamers who stream Minecraft or other games popular with younger audiences may use extremely vulgar language.
The best way to moderate what your child watches is to take interest in their favorite streamers and check if their channels are appropriate for his or her age.
3 Steps to Disable Direct Messaging on Twitch
- Open Twitch on your mobile device and tap on your child’s username in the top left corner. Select “Account settings.”
- Tap on “Security & Privacy.”
- Scroll down and toggle the switch next to “Block Whispers from Strangers” to off.
Reddit is one of the biggest peer-to-peer information-sharing platforms on the planet. It has libraries on quite possibly every topic imaginable, from child-friendly forums about TV shows to extreme and explicit adult content.
To alert younger users and their parents that the latter content is not appropriate for children, it’s usually clearly labeled as NSFL (Not Safe For Life) or NSFW (Not Safe For Work).
Both of these tags automatically hide inappropriate images and videos. Nonetheless, it’s essential to have parental control on Reddit because this isn’t a guarantee that they won’t see harmful content.
If you decide to let your child use Reddit, don’t let them sign up. Using the website without logging in will automatically block NSFL and NSFW content. Alternatively, if you do want to create an account, sign up for them with your own email address. This will allow you to regularly monitor what kind of content they view and prevent them from changing the password.
Creating a More Child-Friendly Reddit Experience For Your Child
- Select your child’s profile icon and tap “Settings.”
- Under “Settings”, select the “Preferences” tab and toggle “Show mature (18+) content” off.
- In “Preferences,” you can also switch off the “Autoplay media” setting.
- Now, move on to the “Privacy” tab. Untick every option possible to restrict any form of data collection and personalization. You can also add a list of user accounts to block, and manage who can message your child’s account.
Further enhancing the parental controls is the Reddit Enhancement Suite (RES) browser extension. It’s an independent, community-driven Reddit browser that provides safer browsing while using the platform. Although Reddit itself won’t allow you to block any subreddits, you can use RES to restrict user access to forums that display gore, sexual images, or other inappropriate content.
Unfortunately, Reddit parental controls don’t exist on its iOS app. However, you can turn off R-rated content directly within the device settings on both iOS and Android devices.
Turn Off NSFW On Reddit
On iOS Devices
- Log in to the correct Reddit account on your iOS device.
- Navigate to Settings, find Reddit in the app list.
- Set the toggle for “Show NSFW Content (18+)” to the off position.
- Toggle on the “Blur NSFW Images” setting.
On Android Devices
- Open the app and confirm that you’re logged into the correct account.
- Click on your profile icon and navigate to the “User Settings” section.
- Select the “View Options” and toggle off the “Show NSFW Content (I’m over 18)” setting.
Enable Maximum Child Protection on Every Device
- Apple: iPhone, iPad, iPod, and MacOS
- Android
- Windows 11, 10, 8, and 8.1,
- Chromebook
- Amazon Fire Tablet
- Home Assistants: Google Home, Google Nest, Amazon Echo, and HomePod
Apple Devices
iPhone, iPad, and iPod Touch
Apple’s “Family Sharing” feature gives parents full control over their children’s iPhones, iPads, and iPods.
As the family organizer, you can manage screen time settings and enable “Ask to Buy”, which requires your approval for your children to be able to purchase or download apps.
Set Screen Time & Privacy Restrictions to Keep Your Kid Safe on Apple Devices:
- Go into “Settings” on your child’s device.
- Tap “Screen Time” and select “This Is My Child’s [device].” Follow the prompts until you have to set up a passcode.
- Once set up, go into “Content & Privacy Restrictions” and toggle the switch to the “on” position. Now you can apply restrictions in various categories.
- Tap “iTunes & App Store Purchases.” Tap on each of the options beneath “Store purchases & re-downloads” and tap “Don’t Allow” to disable.
- Navigate to “Allowed Apps & Features.” Toggle the switches alongside the apps in the list you’d like to restrict to the “off” position.
- In the “Content & Privacy Restrictions” menu, tap “Store, Web, Siri & Came Center Content.” In this sub menu, you’ll be able to restrict content like websites, music, movies, books, podcasts, and other apps based on age, language, and other factors.
- Return to “Content & Privacy Restrictions” and navigate to “Privacy.” Tap on the features that you’d like to control and select “Don’t Allow Changes”, switch the toggle alongside the relevant apps to on or off depending on your preferences for that feature.
You can also use “Family Sharing” to monitor and approve screen time requests from your child. Your child’s requests will go to Messages and you can approve them directly there or or in the “Screen Time” section under “Settings.”
Configuring Family Sharing and Ask to Buy on Apple Devices
- Open “Settings” and tap on your name. Tap “Family Sharing” and add your child’s Apple ID by tapping the icon in the top left corner followed by “Create Child Account”. Then follow the on-screen prompts.
- To enable Ask to Buy, go to “Settings” and select “Family.” Tap your child’s name and toggle on “Ask to Buy.”
macOS
Setting up parental controls on macOS varies depending on what macOS version your child is using.
macOS Sonoma
macOS Sonoma brings a refined approach to parental controls, aligning them more closely with the Screen Time features found in iPhones and iPads. This new setup allows for more nuanced control over content and privacy on your child’s Mac, ensuring a safe and appropriate computing environment.
Use Screen Time to Secure Your Child’s Device
- Press the Apple icon in the top left corner of the screen, select “System Settings”, and tap “Screen Time” in the sidebar.
- Select “Content & Privacy” and toggle it on if it’s not already activated.
- Click on “Content Restrictions” to restrict web content off based on your preferences.
- Click on “Store Restrictions” to manage access to movies, TV shows, and app purchases. Toggle the options to suit your requirements.
- Click “App Restrictions” to manually adjust which apps are accessible by your child.
- Click “Preference Restrictions” to lock certain settings, such as allowing account or passcode changes.
- Back in the “Screen Time” menu, you can adjust who your child can communicate with during screen time and downtime under “Communication”.
- Click on “Communication Safety” and toggle the switch to on to have the device automatically detect inappropriate photos and videos before they’re received by or viewed on your child’s device.
- Return to the “Screen Time” menu and set app limits, schedule downtime, and turn on screen distance under “Limit Usage”.
To keep an eye on your child’s activity on their Mac, you can navigate to the main “Screen Time” menu under “System Settings.” Then click “App & Website Activity” to see how much time they’ve been spending on certain activities.
Insider Tip: You can use your own device to remotely monitor your child’s activity on macOS using the Family Sharing app. Without it, you’ll have to log in to your child’s Mac to check what they’ve been using it for.
Android Devices
Unlike Apple devices, most Android phones and tablets don’t have specific settings for parental controls. While you can manage certain options in the Google Play Store to disable specific apps and prevent accidental purchases, you won’t be able to turn on phone-wide restrictions.
Manage Online Restrictions in the Google Play Store:
- Open the Play Store app and sign in (if you’re not logged in already).
- Tap the profile icon in the top right corner, then press “Settings.”
- Scroll down to “Family” and press “Parental controls.” Turn it on and create a PIN.
- Now, you can control different sections of the Play Store. Set age restrictions for “Apps & games,” “Films,” “TV,” “Books,” and “Music” by tapping on each option.
- Go back into Play Store Settings and find “Purchase verification.” In this menu, use the toggles to switch biometric verification on or off, and set the frequency for requiring verification.
To monitor your child’s phone habits, you can download the Family Link app on their device. This app helps you set ground rules for phone usage, such as managing which apps are allowed and setting time restrictions so you can choose when your child can use their phone and when they can’t.
You will need your own Google account to set up and manage your child’s parental control settings. Simply open the Family Link app or visit g.co/YourFamily to access the settings.
Windows 10 and 11
Managing parental controls on your Windows device will differ depending on your device’s operating system. Before you begin enabling any restrictions, make sure your child has Microsoft accounts linked with your own. This will ensure their maximum online safety and it won’t limit your own digital experience.
How to Set Up Parental Controls on Windows 11
- Navigate to the search bar and search “Family.”
- Open the app, click “Add a family member,” and follow the prompts to add your kids using either email addresses or phone numbers. Designate their account as a “Member” account.
- Navigate to the “Your features” tab and adjust the settings for each of the features that appear in the menu.
Set Up Parental Controls on Windows 10
- Press the Windows button in the bottom left corner. Open “Settings” and click “Accounts.”
- Find “Family & other users,” select your child’s account and go into “Manage family settings online” to open Microsoft Family Parental Control in your web browser.
- On the user tile with your child’s name, click the options icon (three dots) and then “Go to overview.” This will direct you to your child’s Family profile page.
- On the left-hand menu, click on “Screen Time,” “Content Filters,” or “Spending” to access the settings and set preferences for each of these attributes.
Chromebook
Any child who wants to use a Chromebook or the Google Play Store needs their own Google account. Google’s underage profiles already come with a set of pre-programmed restrictions, such as blocking the use of the incognito mode in Chrome or the option to block explicit online content.
To control specific Chromebook features, you need to download and set up Google’s Family Link app. The program is very simple to use, but to start you need to log in to both your and your child’s Google account.
Writer’s Advice: Family Link works only on Chromebooks running Chrome OS version 71 or higher. Make sure your operating system is up to date before setting up family restrictions.
Block Unwanted Content on Chromebook:
- Open the Family Link app and select your kid’s account.
- Click “Controls,”go to “Content restrictions,” and select “Google Chrome.”
- Select the desired filter: “Allow all sites,” “Try to block explicit sites,” or “Only allow approved sites.”
- To create a list of certain sites your child can and and cannot access, navigate to “Approved sites” or “Blocked sites,” and add the website URLs.
- To change website permission settings, including permission to use the device’s camera, location, and notifications, click “Advanced settings”. Turn off “Permissions for sites, apps and extensions.”
You’ll use Family Link to lock these settings and prevent your kids from changing them without your permission. If you want to make any adjustments, you’ll need to go to the Family Link app on your device to get a unique code that you can then use to unlock the settings on your child’s device. This code changes every few minutes and can only be accessed via the app or website.
Amazon Fire Tablet
The Amazon Fire Tablet settings give you a lot of control over your child’s digital habits. You can also monitor your child’s activity on the tablet using your own device via the Amazon Parent Dashboard app. To set everything up, you’ll need to set your child’s account on their tablet.
Set Up a Child’s Account on an Amazon Fire Tablet
- Open “Settings” and tap “Profiles & Family Library.”
- Press “Add a Child Profile” and set up a PIN password.
- Enter your child’s name, gender, and date of birth.
- To confirm, press “Add Profile.”
Once the child’s account is created, you can apply more restrictions like screen time limits and age-specific filters.
Enable Parental Controls on Your Child’s Amazon Fire Tablet
- Navigate to “Settings” and tap “Parental Controls.”
- Turn these settings on by moving the toggle to the “on” position. You’ll be prompted to set up a password of your choice. This will automatically restrict web browsers, online purchases, and certain types of content, such as the built-in Alexa app.
- Select “Amazon Content and Apps” to apply further limits. You’ll be able to block the camera, messaging, Amazon Video, maps, Audible, and more.
- Navigate to “Set Restricted Access” and move the toggle to the “on” position. Set a specific schedule to prevent your child from accessing the tablet outside of permitted times.
- Finally, turn on “Monitor This Profile” if you’d like to regularly review the account activity.
Additional parental controls can be accessed through Amazon Kids+, previously known as Amazon FreeTime Unlimited. This subscription service, accessible on devices like the Fire Tablet, Kindle, and iOS and Android phones, offers children a wide selection of age-appropriate games, videos, books, and apps.
The Parent Dashboard in Amazon Kids+ allows for robust control, including activity monitoring, screen time limits, and a ‘Learn First’ feature to prioritize educational content.
Set Parental Controls For Amazon Kids+:
- Download or open the Amazon Kids+ app on your phone or tablet. Sign in using your Amazon account and create a profile for your child by entering their name and birthdate. Tap “Save.”
- On the home page, tap the profile icon in the top left corner. Tap “View Settings” and enter your password. Tap “Manage Child Profiles.”
- Select “Set Daily Time Limits” to set content viewing restrictions or set up “Learn First” blocks to prioritize educational content.
- To configure web browsing restrictions, select “Modify Web Browser” under “Settings.” Tap “Hand-Selected Websites & Videos” to provide your child access to the websites pre-screened by the Amazon Kids team or select “Filtered Websites & Videos” to manually block specific websites.
- Tap “Manage Communications,” followed by “Hide these features on Fire tablet” to turn off calls, messages, and announcements.
Home Assistants: Google Home, Google Nest, Amazon Echo, and HomePod
Be careful! Enabling parental controls on home assistants won’t stop them from collecting your child’s data, such as their name, interests, birth date, and voice recordings. This cannot be turned off at any point.
Google Home and Google Nest
Google home devices allow you to control explicit content and block it from playing on YouTube apps, Google Play Music, and other apps you have installed.
The speakers come with a built-in Digital wellbeing setting that filters unwanted content when turned on. These restrictions can be applied to all speakers connected to your account or selected supervised accounts and guests.
Set Up Digital Protection on Google Home and Google Nest:
- Tap the Google Home app on your smartphone.
- Go into “Settings” and press “Digital wellbeing.”
- Select “Set up or Add device filter” and then “Next” to begin adjusting filters.
- Pick whether the restrictions should apply to “Everyone” or “Only Supervised Accounts and guests.” Then decide what devices you’d like to control and press “Next.”
- Apply filters to the platforms you’d like to restrict (e.g. Videos, Music, Podcasts, etc.) using the available options.
- To apply filters or turn on restricted mode for YouTube, YouTube Music, and YouTube TV, tap “YouTube settings” under “Notifications & Digital Wellbeing”. Under “Filter content for YouTube TV,”, toggle on “Filter for me”. Under “Use Restricted Mode,” toggle on “Restrict for me” or “Restrict when someone isn’t recognized.”
- Finally, set up “Downtime” to decide when your home devices can be used. You can create a custom schedule or choose one of the preexisting ones.
- To confirm your choices, tap “Done.”
Amazon Echo
All Echo devices come with a free built-in parental control setting you can enable anytime. In fact, there are two ways you can restrict inappropriate content on your Alexa device. One allows you to simply turn on and off certain features within the Amazon Echo app.
The second, more comprehensive option involves using Amazon Kids+ (formerly known as FreeTime), as mentioned above. Amazon Kids+ is a subscription service designed to create a child-friendly experience. It provides enhanced parental controls, including activity monitoring, screen time limits, and a ‘Learn First’ feature to prioritize educational content.
Easily Enable Restrictions on Amazon Echo without Amazon Kids
- In the Alexa application tap “Devices” and select your device from the list.
- Tap the gear icon, scroll down to “Amazon Kids,” and toggle on the slider. From here, you’ll be asked to create a profile or select an existing one. You can add content and adjust settings, like daily usage limits, for your child’s account via the “Parent Dashboard.”
- Next, go back to the homepage and select “More” in the bottom right. Select “Settings” and press “Music & Podcasts.” From there, you can turn on the “Explicit filter.” Enabling this option will automatically stop TuneIn from working as it’s impossible to filter explicit content on separate radio stations.
- Finally, go into “Account Settings” and “Voice Purchasing.” You’ll be able to disable the voice purchases altogether or set up a 4-digit voice code that Alexa will ask for before placing any orders.
Turn On Parental Controls Using Amazon Kids
- Open the Alexa app on your phone or tablet. Tap “Devices” in the bottom row and select which device you want to restrict.
- Press the wheel icon in the top right corner and scroll down to “Amazon Kids.” Toggle on the switch to enable it.
- Follow the on-screen instructions to create or select your child’s profile. From here, you can set daily time limits, restrict content, and pause devices.
HomePod
The HomePod is Apple’s answer to the Amazon Echo and Google Home. Unfortunately, it doesn’t allow for many child-friendly changes to be applied. Your only options are to restrict Apple Music from playing explicit content and disable Siri requests. You cannot set up automatic child voice recognition or even turn off online purchases.
How to Make Your HomePod More Child-Friendly
- Open the Home App and press the ellipsis icon.
- Go into “Home Settings.”
- Select the user and toggle off “Allow Explicit Content.” This will block HomePod from playing Music or Podcasts that contain explicit material.
Safeguard Young Players on All Gaming Consoles and Platforms
PlayStation
PlayStation 5
PlayStation 5 (as well as PS5 Slim) come with Sony’s latest parental control features. In order to enable them, you’ll have to create a family account and assign yourself as Family Manager. Doing so will allow you to make sub-accounts for all your children. This system makes setting up the restrictions much faster as you can apply them to all sub-accounts at once.
Enable Parental Controls and Family Management on PlayStation 5
- Sign into the PlayStation Network and select “Settings” in the top right-hand corner of the screen.
- Press “Family and Parental Controls” and then “Family Management.”
- If you need to set up a profile for your child, select “Add Family Member” and then “Add a Child.”
- Go back into “Family Management,” choose your child’s profile and scroll down to tap “Parental Controls.”
- Set the restriction level based on the age of your child.
- Next, select “Communication and User-Generated Content” to restrict your child from chatting with other players.
- Tap “In-Game Spending” to set a spending limit for your child’s account.
- Choose “Web Browsing” to manually restrict access to certain websites, including those shared in messages or links inside of games.
- Finally, tap “Playtime Settings” to set play time settings for your child. You can set duration and playable hours or restrict play time altogether.
PlayStation 4
PlayStation 4 (as well as PlayStation Pro and PlayStation Slim) offer similar parental controls to the PlayStation 5, with some small differences in procedure and wording.
To access the parental controls, navigate to “Settings” and select “Parental Controls” or “Family Management.” From there, you can access the same parental controls available on the PlayStation 5.
To change the spending limit on your child’s account, you will need to select “Applications” under “Parental Controls” or “Family Management”. Next, press “Devices” and then “Network Features”. Select “Monthly Spending Limit” to manually adjust the amount you want your child to have access to.
PlayStation 3
Parental restrictions on PlayStation 3 aren’t as extensive as on Sony’s later consoles.
You won’t be able to create time or spending limits or monitor your child’s gaming activity from your own device. However, you can choose age-appropriate game restrictions and disable internet browsing.
How to Switch on Parental Controls on PlayStation 3
- Turn on your gaming console and select “Settings.”
- Scroll down to find “Security Settings,” then select “Parental Control.”
- When prompted, enter your passcode (“0000” is the default code if you haven’t already set one up).
- Now, choose the maturity rating from 3 to 10 to restrict the games your child can play. The lower the number you select, the tighter the control.
- Go back to “Security Settings.” Select “Internet Browser Start Control” and set it to “On.”
- To restrict the access to DVDs or Blu-ay, go into “Blu-ray/DVD Parental Control.” Choose your desired restriction level—the lower the number, the higher the controls.
Useful Hint: Sony recommends setting a system restriction passcode after you turn parental controls on. It’ll prevent anyone from changing the settings without your knowledge.
Xbox
All Xbox consoles come with a set of strict parental controls. These built-in family settings allow all parents to set spending bans, control how much time their children spend playing games, and restrict social interaction.
To alter any settings, you and each of your children will need to use separate Microsoft accounts to log in to the console.
Xbox Series X and Xbox Series S
To manage parental controls on the Xbox Series X and S, it’s essential to first set up a Microsoft family group. These settings will extend across all Microsoft products you use, including Windows and Office. The process is more straightforward when done through a web browser on a computer.
How to Set Up Microsoft Family for Xbox Series X or S
- Log in to your Microsoft account page via your the web browser and click “View your family.”
- Choose “Add a family member” to include someone new to your family group. You can have up to six members. Select “Create an account” for new users or enter existing login credentials.
- Once you’ve created or logged in to an account, it will appear on your family dashboard. Here, you can customize each profile, view recent activity, and set up parental controls by selecting “Go to overview.”
- To add your child to your Xbox console, press the Xbox button on your controller and open “Settings” by selecting the wheel icon in the top left corner.
- Select “Account” and then “Family settings.”
- Choose “Manage family members,” pick your child’s profile, and then select “Add to this Xbox console.”
While some parental controls are adjustable directly from the console, others can be managed through the Family Safety page on Microsoft’s website or via the Microsoft Family Safety apps for Android or iOS.
To prevent your child from switching user accounts, it’s advisable to set up a PIN for your user account on the Xbox. You can do this by navigating to “Account” on your Xbox console and selecting “Sign-in, security & PIN.”
How to Adjust Parental Controls on Xbox Series X or S
- Open “Settings” from the dashboard by selecting the wheel icon in the top left corner.
- Navigate to “Account,” “Family settings,” and select “Manage family members.”
- Select your child’s account from the list to view available control options.
- Choose “Access to content” to set age restrictions on games, movies, and other content. “Web filtering” allows you to manage internet access through the Xbox browser, including setting up a specific list of allowed sites.
- Under “Privacy & online safety,” select “Message safety” to filter or block Xbox messaging service content.
- Choose “Xbox privacy” for a comprehensive suite of parental controls. Here, you can select default settings (child, teen, adult) or customize in detail.
- Select “Buy & download” to manage your child’s privileges for purchasing games and content.
Screen time settings are not accessible directly on the Xbox and can only be managed via the Family Safety website or mobile app. To access these settings online, click the three dots next to your child’s profile and navigate to “Overview” and then “Screen time.” In the mobile app, select your child’s profile, then press “Manage” next to “Screen time.”
Xbox One
Setting up parental restrictions on Xbox One will override any settings on all apps installed on your device. This means that you won’t have to place additional restrictions on Netflix or Amazon Prime Video.
Restrict Content using Parental Controls on Xbox One
- Open “Profile & system” from the Xbox dashboard and navigate to “Settings.” Scroll to “Family settings,” then select the child profile you want to modify.
- Tap “Privacy & online safety” and “Xbox privacy.”
- From this menu, you can choose from the default “Child,” “Teen,” or “Adult” settings, and further customize them by selecting “View details & customize.”
Xbox 360
Create Content Restrictions on Your Child’s Xbox 360
- Go into “Settings” in the top right corner and select “Family.”
- Tap “On” to set a security password and enter a 4-digit passcode.
- Choose “Family Timer” and decide if you want to set a daily or weekly limit. Press “Continue,” then “Save and Exit.”
- Within the “Family” menu, tap “Ratings and Content.” Restrict game access based on maturity ratings. Confirm with “Save and Exit.”
- From the “Settings” menu, choose a child account you’d like to manage. Go to “Online Safety,” then press “Change Settings.”
- Choose between “Child” and “Teen” restrictions or select “Custom” to manually set desired limits. Press B on your controller or “Save and Exit.”
Nintendo Switch
Nintendo Switch is considered one of the safest gaming consoles. The console’s creators installed pre-made control levels to make the process even easier for busy and less tech-savvy parents. By enabling parental controls, you can make sure your little ones don’t accidentally play an M-rated game or make any purchases without your knowledge.
How to Turn on Parental Controls on Nintendo Switch:
- On the home screen, select “System Settings.”
- Tap “Parental Controls” and find “Parental Controls Settings.”
- You’ll be asked whether you want to use the Nintendo Switch Parental Controls app. Choose to change the settings directly through the Switch you’re using.
- Press “Restriction Level.” You’ll have a choice between applying pre-made settings for “Child,” “Pre-Teen,” or “Teen,” or applying “Custom Settings” where you can choose exactly what restrictions you’d like to apply.
Don’t worry if you’re not entirely sure how to use your child’s Switch—you can apply parental controls from your own smartphone! However, before setting any restrictions, you’ll need to link your smart device with your child’s Nintendo Switch via the Nintendo Switch Parental Controls app.
Apply Parental Controls on Nintendo Switch Using Your Phone
- Download and open the Nintendo Switch Parental Controls application on your smartphone, and log in to your Nintendo Account.
- Select “Console Settings” in the upper or lower right-hand corner of the app.
- Select “Parental Controls,” then select each setting you want to adjust:
- Play-Time Limit: Limit the amount of time the console can be used for each day.
- Bedtime Limit: Prevent gameplay between certain hours each day.
- Restriction Level: Choose from pre-set restrictions for Teen, Pre-Teen, or Child. Alternatively, customize the settings for software, social media, communications, and VR use.
- Whitelist: Exclude certain software from Parental Controls.
- PIN: View or change the Parental Controls PIN for your device.
Steam
If your child prefers computer gaming to consoles, then Steam is likely to be their go-to platform. It holds an impressively large cloud-based library of games—sadly, not all of them are age-appropriate.
To make sure your child uses the platform safely, you can use Steam’s Family View controls. This will restrict content and display only family-friendly titles while your child is logged in. The feature can be turned on and off with just one click of a button once it’s set up, so it won’t limit your own gaming experience if you share your account with kids.
Make a Steam Account More Child-Appropriate Using Family View
- Open Steam and log in with the account your child will use.
- Navigate to “Settings” in the menu and go to the “Family” tab on in the left-hand menu.
- Go to the “Family View” section and click on “Family View” to launch the wizard.
- Follow the on-screen instructions to implement restrictions and limits.
- Set a recovery email address along with a PIN code.
- Retrieve the confirmation code sent to your recovery email address and enter it into the Steam Client to complete the process.
Origins/EA
Origins automatically applies restrictions and parental controls for any user under 13. This means that your child won’t have access to any of the platform’s online features, such as multiplayer games or the Origins Store. Child accounts also won’t show up in the user search bar, removing any possibility for social interaction through the platform.
To create a child account, you’ll need to sign up yourself first. Do so by navigating to the Origins website and clicking “Register.” Once you’ve created the account, download the Origins app on your computer and open it. This will prompt the account setup page to show up.
Create a Child Account on Origins
- Tap “Create an Account” at the top of the window.
- Select your country/region and your child’s date of birth. Origins will automatically recognize and create a child’s account based on the chosen year of birth.
- Check both “Privacy & Cookie Policy” and “User Agreement,” then click “Next.”
- Type in the email address you used to create your own account. Enter and confirm your password.
- Create a public ID for your child. You may want to involve him or her in this process, but avoid using any real names.
- Press “Create an account.”
- Navigate to your email inbox to retrieve the confirmation email sent by Origins.
- By default, your child’s account will use the password you created for your own profile. You can change that by selecting “Forgot your password?”, retrieving the password recovery email from your inbox, and following the instructions to reset.
Apply Child-Friendly Controls on Smart TVs
Roku TV
Roku TV doesn’t allow for many parental controls to be applied and those that do exist will only restrict Roku Channels and Roku TV features. Enabling them on the TV box itself won’t apply them within the third-party apps (like Netflix or YouTube), so you’ll need to turn those on manually.
Prevent Your Children From Viewing Inappropriate Content on Roku TV
- Using a laptop or a phone, go to roku.com and log in to your account.
- Tap “My Accounts,” and look for “Pin Preference.” Then click “Update.”
- Enter a chosen PIN and click “Save PIN.”
- Choose the age restrictions you’d like to put in place. You can choose between “Off,” “Little Kids,” “Young Kids,” and “Teens.”
- Now, turn on your Roku TV box. Using the remote, press the home button.
- Select “Settings” and then “Parental Controls.”
- Turn on “Enable parental controls” and set an age restriction on available cable channels. This will automatically disable Movie Store and TV Store, so neither will display on the home page. You can also block certain content in this area.
Apple TV
Apple offers a multitude of features on its TV box that allow you to control every feature available, including online purchases, maturity rating, Siri, and screen recording.
Keep in mind that changing these settings won’t have an impact on restrictions within third-party apps, such as Netflix, Hulu, or YouTube. You’ll have to manually block their content using in-app settings.
Modify Restrictions Available on Apple TV:
- Open ”Settings” on your Apple TV, go to “General” and then select “Restrictions.”
- Enter or set up a PIN passcode. This will enable you to make custom changes to all available control options.
- Go through the list of possible restrictions and turn them on. You will be prompted to enter a 4-digit passcode to confirm your choices and prevent further changes.
Amazon Fire TV Stick
Similar to other streaming devices, Amazon Fire TV Stick restrictions will only apply to Prime Video viewing options. However, if you don’t want your children to access third-party apps, you can secure them with PIN protection. Even if your little ones try to open an app they’re not supposed to without supervision, it won’t start unless they enter the correct code.
Control What Your Children Can Do with Amazon Fire TV Stick
- Navigate to the Fire TV Stick Settings.
- Click “Preferences” and go to “Parental Controls.”
- Press “Parental Controls” again. You’ll be asked to enter or set up a 5-digit PIN.
- Turn on PIN protection on purchases, app launches, and Prime Photos.
- Tap “Viewing Restrictions” and select from maturity ratings “General,” “Family,” “Teen,” and “Mature.”
- Open the Amazon Music app, select your profile in the top right, and go into “Preferences.”
- Select the box next to “Block Explicit Songs” to disable inappropriate music playback.
Samsung TV
Samsung TV’s parental controls are limited. To stop your child from accessing mature shows on any apps installed on your smart TV, you’ll need to lock each app separately. This will prevent kids from opening an app, but they’ll have full control over what they watch unless you apply parental controls within the streaming apps themselves.
Turn on Parental Protection on Samsung TV
- Click the home button on your smart TV remote and select “Settings” in the bottom left corner.
- Press “General & Privacy” and go to “System Manager.”
- Tap “Change PIN” and set up the code you’ll use later to restrict certain features.
- Using the menu on the left, go into “Parental Settings,” and tap “Programme Rating Lock.” Here you can set a rating level that’s appropriate for your child. Samsung TV will block programs according to the rating you’ve set.
- To lock apps, press the home button on your remote again and select “Apps.”
- Find “Settings” in the top right corner. All installed apps will be displayed on your screen. Hover over the ones you’d like to lock and choose “Lock/Unlock.”
- Enter the PIN you created before. The selected app will display a small lock icon in its top right corner. This means you’ll need to enter the security code to access it.
Configure Parental Controls on Internet Browsers
Firefox and Opera
Firefox and Opera are the only internet browsers that don’t have any built-in parental restrictions. To stop your child from accessing inappropriate content, you’ll need to apply external parental controls by downloading a third-party app (also known as an extension). Some of the most popular extensions include FoxFilter, Family Friendly Filter (on Firefox) and Disconnect (on Opera).
Alternatively, you can apply parental restrictions on the device they use to browse the internet. This will automatically apply content protection on any internet browser installed. You can refer to our device section above for step-by-step instructions as to how to do this on each device.
Google Chrome
Chrome online protection can be enabled directly within the browser and using the Family Link app.
As the browser and the app have different protection controls, it’s best to turn parental controls on for both platforms. Remember to log in to your child’s Google account so you can apply the changes to their browsing rather than your own.
Creating a child account within the Family Link app will by default disable the use of the incognito browser mode and access to the Google Play or Chrome Store. Additional protections need to be turned on manually.
Enable Safe Browsing on Google Chrome
- Open Chrome, click the three dots in the upper right corner, and scroll down to “Settings.”
- Click “Privacy and security” and open “Security.”
- Turn on “Enhanced protection” to enable Chrome to recognize and prevent any online dangers such as malicious downloads and password detection.
Apply Child Protection on Google Chrome Through the Family Link App
- Open the Family Link app and select your child’s Google account.
- Tap “Controls”, then “Content restrictions,” and select “Google Chrome.”
- Choose the browsing restriction that suits your family’s needs: “Allow all sites,” “Try to block explicit sites,” or “Only allow approved sites.”
- Under “Manage sites,” you can approve or block specific websites. To add a site, tap “Approved” or “Blocked,” then “Add a website.”
- To alter site settings and permissions, choose “Advanced settings.”
Internet Explorer
Older Windows laptops have this browser already pre-installed so it’s likely a go-to browser for your child. Luckily, it also comes with a set of built-in security features that are very easy to switch on.
Disable Inappropriate Content on Internet Explorer
- Open the browser on your child’s computer.
- Press the gear icon in the top right corner and select “Internet Options.”
- Tap the “Content” tab, find “Content Advisor,” and tick the box alongside “Enable.”
- Use the slider to choose the level you deem appropriate for your child.
- Finish by clicking “Save.”
Microsoft Edge
Microsoft Edge is the latest internet browser from Microsoft, replacing Internet Explorer as the company’s main default browser.
Microsoft Edge comes pre-installed on all Windows 11 and 10 devices. One of its best features is Kids Mode, which provides a secure online environment for children, with features like custom themes, suitable content, and strict Bing SafeSearch, all without the need for a child account.
How to Access Kids Mode in Microsoft Edge
- Open Microsoft Edge and click the profile icon in the upper right-hand corner of the window.
- Scroll down and select “Browse in Kids Mode.” Note that signing into the browser will sync Kids Mode settings across your devices. If it’s your first time, you’ll get an introduction to the feature.
- Select the appropriate age range for your child to launch Kids Mode.
- Your current browsing window will close, and Kids Mode opens in full screen. Once activated, Edge will always launch in Kids Mode until you exit it.
- To exit, click the Kids Mode icon at the top, select “Exit Kids Mode window,” and enter your credentials.
Safari
Safari automatically comes with certain built-in restrictions you can turn on for your child. These can be applied to any version of the browser—whether your child uses an iPhone, iPad, or Mac. You can even completely disable Safari and stop your children from browsing the internet.
Follow These Steps to Set Up Parental Controls on Safari:
- Go to “System Settings” and then “Screen Time.”
- Select “Content & Privacy” under “Restrictions.” Toggle the button alongside “Content & Privacy” to the on position.
- Select “Content Restrictions.” Under “Web Content” set your preferred level: “Unrestricted”, “Limit Adult Websites”, or “Allowed Websites” to control the type of content accessible through the device’s web browser. Note that this will only apply to Safari if it’s set as your default system browser.
Why You Should Consider Applying Parental Controls on All Platforms and Devices
There are many benefits to giving your children access to the digital world, but there are unfortunately also plenty of dangers.
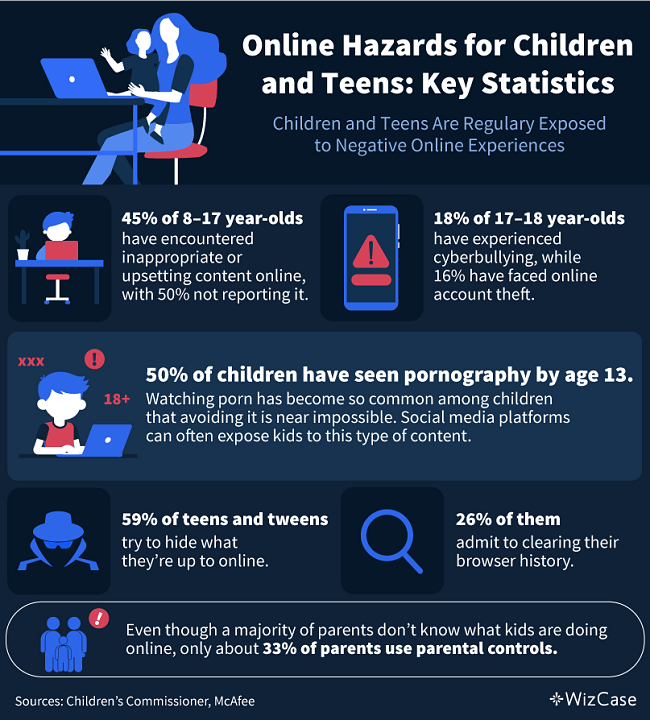
Research from the children’s commissioner for England reveals that 45% of children aged 8 to 17 have encountered material that they found inappropriate, worrying, or upsetting, yet half chose not to report it. This exposure includes not only pornographic and violent imagery but also content related to self-harm and suicide, as well as anonymous trolling and images promoting diet restriction.
While creating an open and understanding environment and implementing rules around device usage in your home can help to protect your kids, the chances that your children will come into contact with inappropriate content remains high.
The average age at which children first encounter pornography is 13, with exposure beginning as early as age 9. The prevalence of violent pornography, involving coercive or degrading acts, is also alarming, with 79% of children encountering it before the age of 18.
This type of content is not restricted to dedicated adult sites, either. Research has found that children are most likely to encounter pornographic material on X (formerly known as Twitter), with Instagram and Snapchat following closely behind.
While you may think your kids are responsible enough to be independent, it’s clear that it’s impossible to prevent them from inappropriate browsing without appropriate protection.
Children, teens, and tweens in particular, are also adept at evading family internet rules. A study carried out by McAfee found that 59% of children engage in some form of action to conceal their online activities.
Common tactics include clearing the browser history (26%), swiftly closing or minimizing the browser when a parent enters the room (21%), hiding or deleting instant messages and videos (15%), browsing in incognito mode (15%), and being untruthful or vague about their online activities (15%). Additionally, 10% use a device that their parents rarely check.
As children grow older, these methods of maintaining privacy, especially clearing browser history and using incognito mode, become increasingly prevalent. Applying even the most basic parental controls is essential for protecting your children from harm, whether intentional or not.
The Most Common Features of Parental Restrictions (And Why You Should Implement Them All)
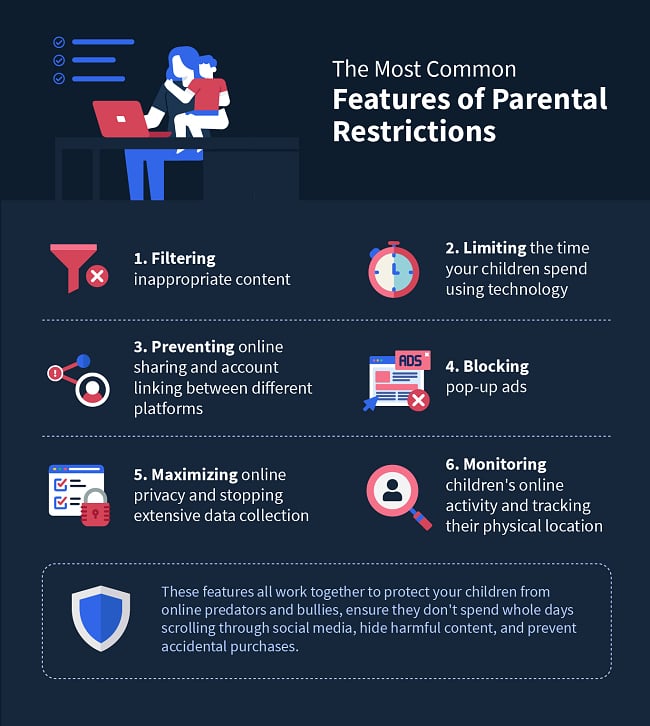
Nowadays, almost all apps and devices come with built-in parental controls. Depending on the platform and device, the options for restrictions often include:
- Filtering inappropriate search engine results, explicit or violent images and videos, and vulgar songs.
- Placing time limits for each day of the week.
- Disabling various online sharing capabilities and account links between different platforms.
- Blocking any pop-ups and clickable ads.
- Enhancing online privacy and preventing excessive data collection.
- Tracking your children’s physical location from your own devices and monitoring their online activity through regular email reports.
Each of these features can protect young online users from different types of harm.
Filtering content and disabling online sharing protects your children from online sexual predators and bullies as well as content that isn’t appropriate for their age. Applying time restrictions ensures teens don’t spend hours scrolling through social media instead of prioritizing their homework and other responsibilities.
Certain controls will also allow you to prevent accidental online purchases and block access to chat rooms. Finally, you can choose from various tracking settings to know exactly where your children are—as long as they have their phone on them.
Are Parental Controls Actually Effective?
Despite their advantages and protective features, parental controls are never 100% effective. Their capabilities are remarkable, but sometimes inappropriate content is created specifically to bypass all online restrictions.
This is particularly insidious on YouTube, where creators can use certain child-friendly tags under incredibly frightening or explicit videos. Incidents include fake Peppa Pig episodes that display graphic and explicit scenes.
Experts argue that although the majority of parental controls are able to enforce restrictions and prevent certain behaviors, they don’t create positive changes your child can learn from. That’s because it can be difficult to find a balance between what’s right and wrong when applying controls.
Overprotection may also cause long-term harm to your children. In many cases, it can impact their decision-making skills or encourage them to rebel against existing rules.
Even though parental controls aren’t perfect, you shouldn’t disregard the importance of applying them to protect your kids online. A total lack of boundaries can put children in direct danger of radicalization or sextortion.
Combined with effective parenting and open conversations, digital restrictions are an extremely powerful tool that can shield your children online.
Expert-Approved Guide to Applying Digital Restrictions
It can be tricky to enforce parental controls, especially if you didn’t implement them as soon as your child began using online platforms. That’s because, as children get older, they tend to rebel against any restrictions that inhibit their freedom.
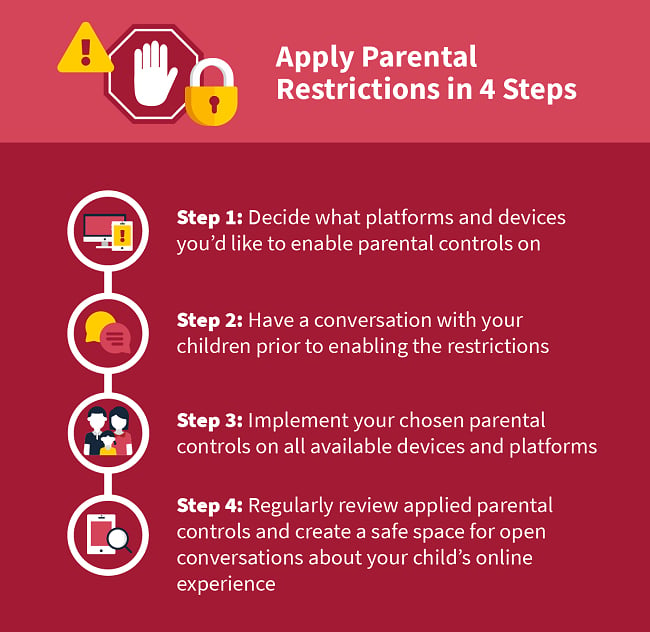
Experts advise following the 4 easy steps below to apply parenting controls effectively.
Step 1: Decide Which Platforms and Devices to Secure
Write down a list with your choices as well as short clarifications of why applying restrictions will benefit your young family members. Depending on their age, your children may try to talk you out of applying parental controls. Creating this list will help you to explain your reasoning to them a lot better.
Step 2: Have a Conversation With Your Child
Explain why parental controls are important and be open about the dangers that could be lurking online. Even if your kids are too young to fully understand what’s going on, they should know these restrictions are there to protect them from extremely harmful content.
It’s likely that your children will want to voice their opinions. If possible, see if you can reach a compromise. This will show your kids that they’re important in the decision-making process and that their point of view is valued.
Step 3: Implement Your Chosen Parental Controls
You can apply as many or as few parental controls as you’d like, depending on what you and your children agreed on. As teenagers are more likely to disobey the rules as they grow up, consider enabling regular monitoring settings to know if they’re following your guidelines.
Step 4: Regularly Review the Applied Parental Controls
Research shows that children who are involved in discussing and planning house rules are less likely to rebel against them in the future. That’s why it could be highly beneficial for you and your child to schedule regular talks about parental controls and why they have to be implemented.
Creating this safe space for open conversations with your child will also allow them to share details about their online experiences.
Tips for Safe Internet Browsing for Each Developmental Stage
Depending on your child’s age, there are different precautions you can take to create a safe online space for your child.
First Digital Steps: 2–4 Years Old
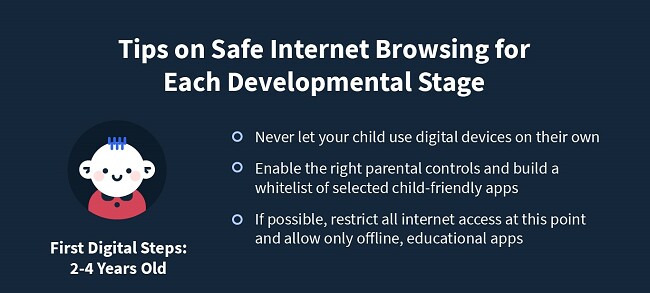
As your child begins their digital journey, it’s crucial to never let them do it on their own.
Whether they choose to watch videos on YouTube Kids or play games on your phone, parental supervision will ensure they don’t accidentally click on inappropriate hyperlinks or ads.
Children at such a young age are especially at risk of being frightened. That’s why it might be beneficial to restrict any access to the internet at this point. Instead, find various offline games and apps to teach your child how to use technology.
If you decide to allow your child access to the internet, always ensure the right parental controls are enabled. It’s also a good idea to build a whitelist with chosen sites and apps that your child can access while blocking anything else.
Learning the Basics: 5–8 Years Old
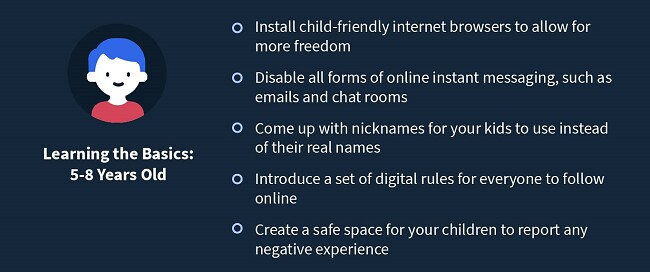
As your child grows, they’ll want to become more independent online. While you still shouldn’t leave them to browse on their own, you can allow for more freedom by installing child-friendly search engines, like Mobicip or The Children’s Internet.
Set up content restrictions on any streaming apps and devices your child uses to prevent dangerous media from being displayed. Disable instant messaging in any form, such as email, chat rooms, and others.
At some point, you should also introduce a set of digital rules for your child to follow when they’re online. These should include not talking to strangers, entering any personal details, and using only an agreed online nickname.
Most importantly, create a safe space for your children to encourage them to tell you when they access anything inappropriate or frightening online.
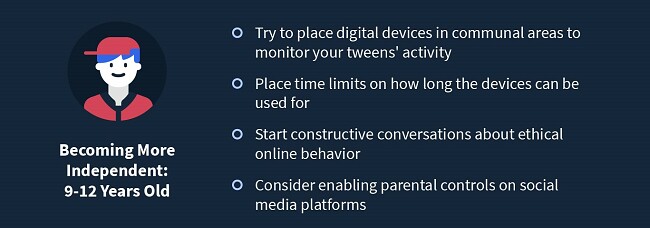
Becoming More Independent: 9–12 years old
This is the time when your child will likely express his or her interest in joining social media apps. While many of those platforms won’t allow anyone younger than 13 to make an account, tweens are very likely to enter a fake birthday so that they can keep up with their peers.
It’s also the time when your child might express the need for more privacy and won’t want you to monitor their online activity. If that’s the case, try to place digital devices such as family computers and tablets in communal areas so you can still keep an eye on what your child does online.
Place time limits on how long your child can use digital devices for. At this age, they’re likely to need it for schoolwork and hobbies, but tweens often stray from their responsibilities to interact with their friends online or play games. Setting time limits on certain apps or devices in general will make sure they aren’t able to waste their time on something they shouldn’t be doing.
Begin constructive conversations about what ethical online behavior is. Your child should understand that the online space isn’t to be used for bullying or spreading gossip. The older they get, the more aware they should be about what could happen to them or others with just one click of a button.
The devices your child uses should still have parental controls in place. Protect them with various PIN codes, if possible, as your child may want to bypass the restrictions or turn them off themselves. Consider doing sporadic spot checks to view the browsing history and what apps have been used. You may want to install specific monitoring apps to stay up-to-date with what your child does online.
Walking Into Adulthood: 13–17 year olds
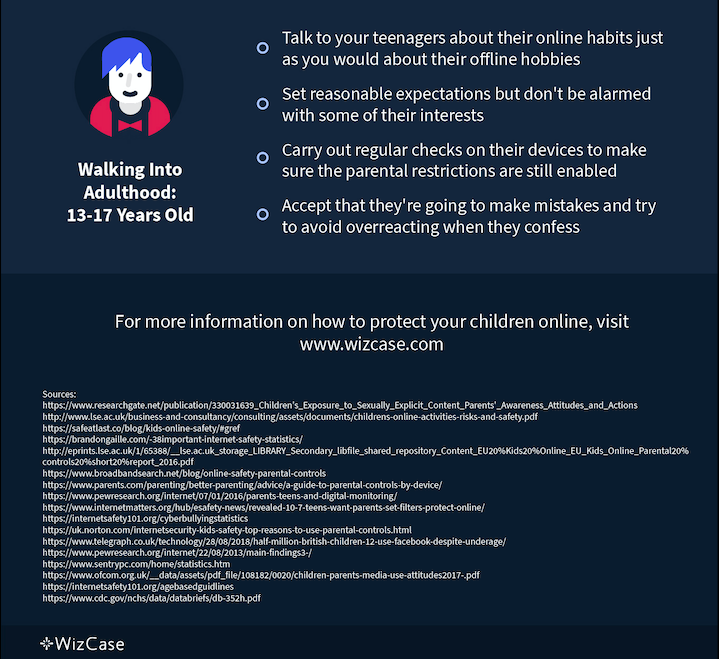
It’s not a secret that teenagers are a lot more difficult to keep safe online. However, they are also more aware of what could happen online, whether that’s from their own experiences or someone else’s.
It’s important to talk to teens about their online activity just as you would about their offline lives. Take interest in their hobbies and get to know their friends. If you had any internet rules before, try to reevaluate them together or create completely new ones.
Set reasonable expectations and don’t be alarmed with their interests. As teens mature physically and emotionally, they’ll be more interested in sexual exploration. This is a normal part of growing up. However, it doesn’t mean you should allow free access to pornography sites. Always make sure you restrict access to overly explicit content through a set of available parental controls.
You may need to carry out regular checks on their personal devices to make sure the restrictions haven’t been turned off. If possible, protect the settings by enabling PIN access only.
Protect Your Children From the Dangers of the Internet Today
As children are becoming increasingly interested in digital devices from a very young age, it’s crucial for parents to implement as many protective methods as possible.
Parental controls are a great method of keeping your kids safe online, but they can never be fully effective. Without constructive and open conversations about how dangerous the internet can be, as well as active parenting, your children may feel overly restricted and rebel against the protective software.
This is why you should never rely solely on parental controls to keep your young ones safe. Instead, consider implementing digital upbringing alongside your chosen restrictions to teach your children about both the benefits and dangers of the internet.